Perhaps installing Windows 11 on a new computer or device with an empty hard drive is the only option. The way of install Windows 11 or Winsows 10 on Mac's internal drive Without Bootcamp Assistant is against Apple's official way. So that I always recommend to our readers that to Install Windows 10 on Mac using boot camp Assistant. Using this installation you can enjoy both OS in a single device . So you need Windows 10 ISO file Downloadto complete your goal today.

The original boot camp having issue whereby always saying error formatting disk and I can't continue to next step. I'm so happy I came across your tutorial video. But ended up with no boot disk after I pressed option key during start up on my iMac late 2013.

The following methods need a Windows 11 ISO file to work. UNetbootin (short for "Universal Netboot Installer") is software that allows you to easily create bootable USB flash drives to install or use operating systems. This software is designed to be cross-platform and works with Windows, as well as Mac and Linux operating systems.
When you create your virtual machine, VMware Workstation Player asks for the location and name of your installer disc image file. Browse to and select your downloaded Windows 11 ISO file. Click Next and then follow the steps to set up the VM and install Windows 11. Press the key and follow the prompts to wipe your hard drive clean and install Windows 11 from scratch. It's fairly easy to create bootable USB installation media for Windows 10 when using Microsoft's Media creation tool.

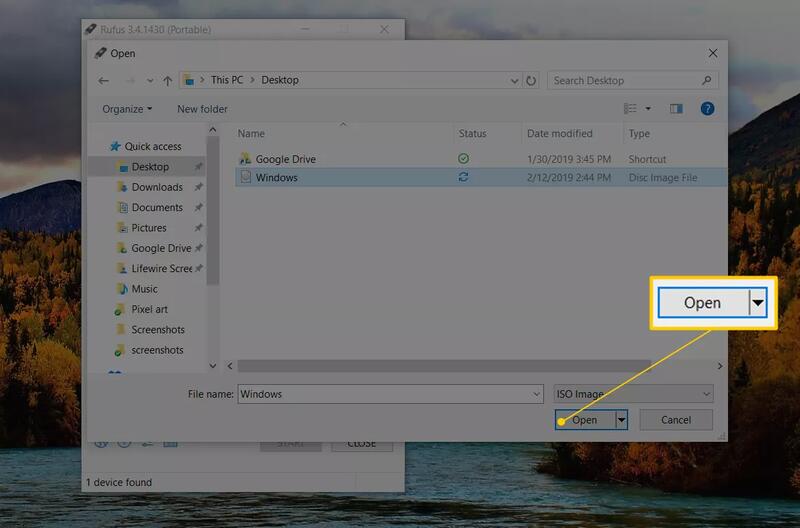
Unfortunately this tool is not available for macOS. This post explains you how to do this without using a Windos-based PC or VM and without using BootCamp assistant. To make a copy of Windows 10 on a USB flash drive, download and launch the Windows Media Creation tool, selectCreate installation media and follow the prompts. Then download and install Rufus to complete the process. ISO images are a better option than using CDs and DVDs to install software.
It is a more efficient way for users to install operating systems and saves disk manufacturing and shipping costs for technology companies. To mount Windows 11 ISO on Mac, simply double-click the Windows11.iso file you downloaded. UNetbootin doesn't erase any files as it doesn't have the ability to format your USB flash drives or external hard drive devices. The key appeal of UNetbootin is that is the simplest choice of software for applications that might seem daunting to beginners.

It does not matter whether you use macOS, Windows 10, or Windows 11. It's just a matter of time until your computer will refuse to start, which could happen for many reasons, including file corruption, hardware failure, and buggy update. If the unexpected happens with an Apple computer, you can use a macOS bootable USB with the installation media to repair it. When the PC or laptop boots from USB successfully, Windows setup program will show up on the screen. At the very first step, please choose an installation language, time format and input keyboard. It is a more efficient way for users to install operating systems and saves manufacturing and shipping costs of discs for technology companies.
To mount Windows 11 ISO on Mac, simply double-click on the Windows11.iso file you downloaded. UNetbootin is a Windows 10 USB tool Mac that is completely free to use and can be used in a scenario wherein you have to make bootable USB Windows 10 on Mac system. For this, you need to keep a USB with the .iso file downloaded in it. Follow the steps below to know how you can use this program to know how to make a bootable USB Windows 10 on Mac. To follow these steps, you may use either Windows 10 or Windows 11.
An effective way to burn the ISO onto a disc or copy it to a USB is through a free Microsoft tool called Windows USB/DVD Download Tool. This program copies the contents of the ISO file to a disc or USB drive, which then becomes bootable. This method is useful if you wish to install Windows 11 on a clean computer or as part of a dual-boot setup.
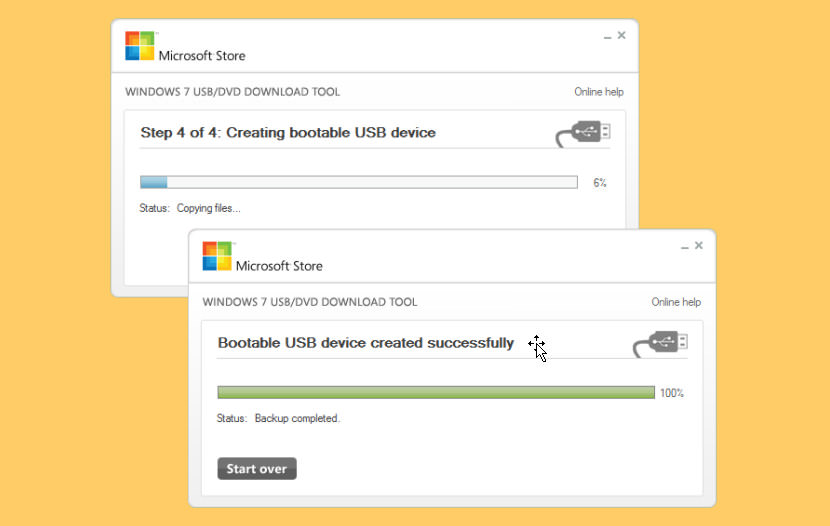
Microsoft no longer offers this utility on its website, but you can still find it at other sites, such as FileHippo and Major Geeks. After the download completes, a WindowSupport folder will be available on the USB drive. Now switch to Windows 11 and double-click on the setup.exe present in the WindowsSupport BootCamp folder. Doing this installs the missing drivers for Windows 11 operating system.
For creating a Windows 11 virtual machine on Mac, choose either VMware Fusion or Parallels Desktop. They are one of the finest virtual machine software for Mac. One prime benefit of these virtual machines is they don't need to reboot or dual-boot your Mac each time you use Windows 11. On Windows 11, the media creation tool can be used to create a bootable USB for Windows 11. Generally, this method is used to install a fresh copy of Windows 11. But it also works if your system doesn't support Windows 11.

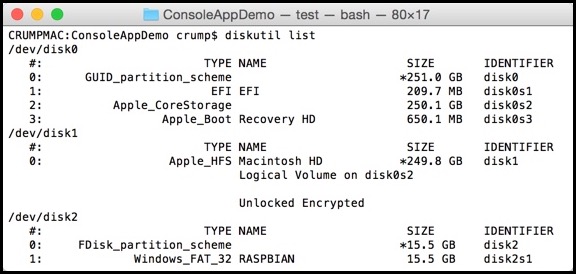
Before installing Windows 11 from the USB, make sure to back up all your personal data. Alternatively, you can try and use the USB drive as a bootable installation drive. However, this is where things get even more complicated, due to Windows 11 requiring Secure Boot, and the USB drive we just created not being compatible with that feature. If the USB flash drive is not working with TransMac, it could still be a partition problem. In this case, you may need to redo the entire process again. To create a macOS boot device with a USB flash drive, download the macOS version you want, connect your USB flash drive to your Mac, and enter the appropriate command in Terminal.

Isn't exciting to run Windows OS on a Mac from an external USB drive, without preparing a costly capacious SSD to install two hybrid operating systems? Are you expected to play Windows games on Mac? However, there is another better alternative way that is able to save a great amount of disk space, at the same time, makes your customized Windows operating system everywhere. As far as I know, there are only two easy ways to create Windows 11 bootable USB on Mac . Once setting it up, there are many free tools available to make Windows 11 installation media.
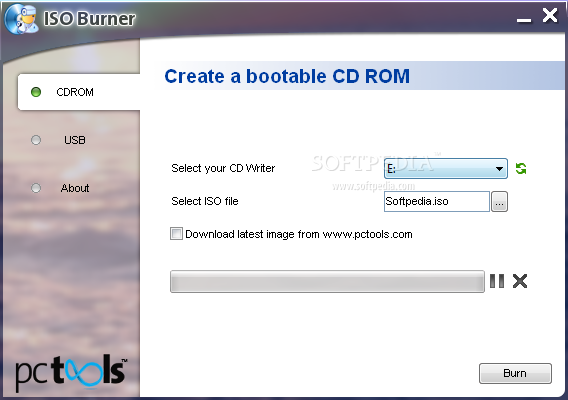
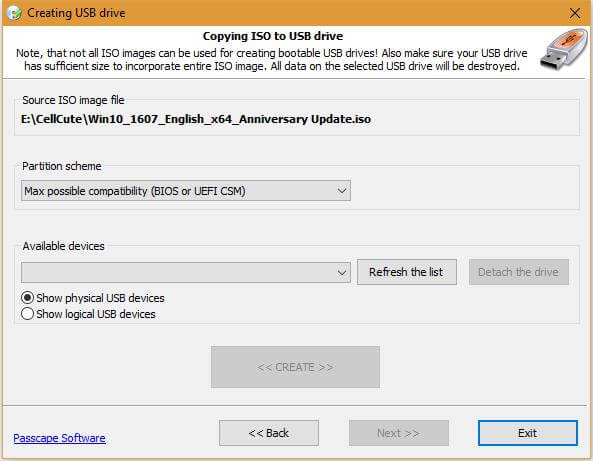
From this time on, all configuration steps are done. Simply click the Burn button at the bottom of this window to burn Windows 11 ISO to USB. This step will format target USB drive, decompress ISO image and copy all files and folders to USB.
Now, plug in a USB flash drive and Run UUByte ISO Editor app on your Mac. In this step, I suggest disconnecting other USB storage devices for data safety reason as the USB drive will be erased later. Next, click on the Burn icon from startup screen to move to a new window, where is the place for making bootable USB drive. Etcher is a open-source tool designed to help users securely write images files to USB drive and SD card, and make them to be bootable. This tool features a user-friendly interface that consists of a single window where you can clearly add the image and select USB drive.

Another advantage is that it supports multiple images files including ISO, IMG or ZIP file formats, but it doesn't provides some useful configuration options like Rufus. The installation process will take a few more minutes. Once the installation is completed, the computer will boot and you will have a final version of Windows 11 on Mac with all the latest features and design upgrades from Microsoft. While you can get regular updates with the beta version of Windows 11, there will be unresolved bugs that can interfere with your experience as a user.
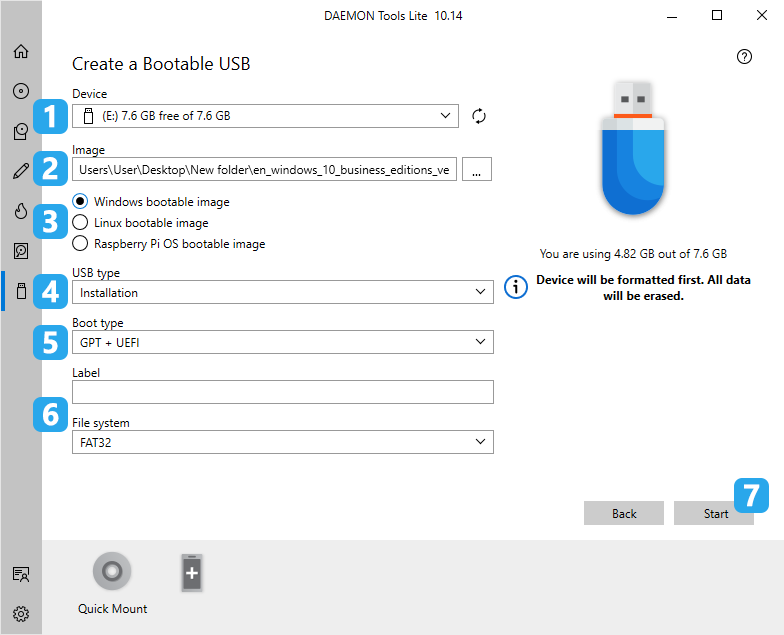
By upgrading to a final version, you can enjoy all the features of Windows 11 without any glitches or inconvenience. The two methods detailed above are free and can be done on Intel or M1 Macs. However, if you want to avoid Terminal and want a UI-based experience instead, you can use UUByte ISO Editor ($29.95, free trial available) to create a bootable disk. The app has broad support for different Mac models and macOS versions, and you can easily create a Windows 11 installer USB using it.

You can also copy partition image files onto Partition 3 of your E2B USB drive. When selected, it will replace the current Partition 3 with the contents inside the image file. This means you can switch in any partition containing any filesystem or swap file or raw partition. For instance, you could UEFI64-boot to agFM and switch-in an hfs partition image for installing Mac OSX onto a system. There is nothing more frustrating that copying over an ISO and then finding that it does not boot!
You then have to search the Internet for a solution which can take hours. With an E2B USB drive you have three different bootable menu systems to try. In addition, the E2B and agFM menu systems support .imgPTN files which allows you to switch-in an image of a partition (it's like having 100 Rufus USB drives in one!).

If you're looking to create bootable DVD installation media it's quicker and simpler than faffing about with the Windows 11 Media Creation Tool. Alternatively, the ISO is perfect for creating a virtual Windows 11 and can be used directly in Mac OS X Boot Camp to get Windows 11 on your system. This will download a tool that will format a USB drive and install a bootable version of the Windows 11 installation media. With the help of the above methods, you can easily create Windows 10 bootable USB on Mac High Sierra. The methods involving Terminal and Disk Utility are pretty complicated, while the other methods are fairly easy and effective. If, during the process, you accidentally lose out on some files and data, you can make use of Tenorshare 4DDiG for Mac Data Recovery to recover these files easily.

It is recommended that to use 4DDiG to recover lost data on windows 10, if you need. Creating a Windows 10 bootable drive is really easy, just connect an 8GB or bigger USB drive with your PC and download Windows 10 media creation tool. The media creation tool will automatically download the Windows 10 and create the bootable drive. In order to avoid data loss, we highly advise you to perform a complete backup of all of your important files beforehand. You may easily create a Windows 11 bootable disk by following the instructions in this article.
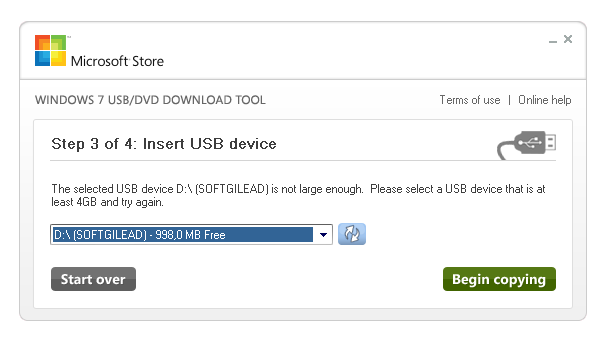
The tool will create bootable media with Windows 11 installation media once you've completed the procedures. After the download, continue with the default settings if you connected a USB flash drive to create bootable media. Thus, UNetbootin makes it possible to create genuine toolkits by having a full range of functional operating systems or systems ready to be installed. Now, everything is facilitated by small USB drives that are offering increasing amounts of storage space. After you download the Windows7-USB-DVD-Download-Tool-Installer.exe file, right-click on it and choose the Run as Administrator option.
Once the installation is complete, launch the tool and then browse to and choose the ISO file you wish to burn or copy. Click Next, then choose either USB device or DVD. Leave the other settings in default state and click Burn button to start burning Windows 11 ISO to USB. UUByte ISO Editor will format the USB drive and write bootable information to USB. Finally, it copies content to USB drive from decompressed ISO file. And you will see a progress bar for monitoring the whole process.
UUByte ISO Editor is a well-known and user-friendly tool for making Windows bootable USB and recently, it adds support for latest Windows 11 ISO. You can use this program on a Windows PC or Mac as it is a cross-platform utility. In addition, this ISO Toolkit can also edit ISO, create new ISO and extract content from ISO file. Please download the program and install it on a Windows PC or Mac. However, it depends on what kind of Mac you are using.

For Apple Silicon Mac, Boot Camp is not available. On Intel Macs, Boot Camp no longer provides support for creating bootable USB. Instead, it only creates boot camp partition since Big Sur as well as Monterey. For old macOS version, it is still good to go. Please allow time for the process to complete. Once the installation is complete, the computer will boot up and have a final version of Windows 11 on Mac with the latest features and design updates from Microsoft.
While you can get regular updates with the beta version of Windows 11, there will be unresolved bugs that can interfere with your user experience. By upgrading to a final version, you can enjoy all the features of Windows 11 without any glitches or hassles. After downloading Windows 11, you will need to create a Windows bootable USB drive to install the new operating system on your Mac.

You must format your bootable USB as an MBR partition before creating the Windows 11 bootable USB. When you finish the installation or upgrade and restart your computer, it may suddenly failed to boot into Windows or appearbluescreen of death. All of these problems refer to the failure of the upgrade because it could lead to the required services or programs not being installed.

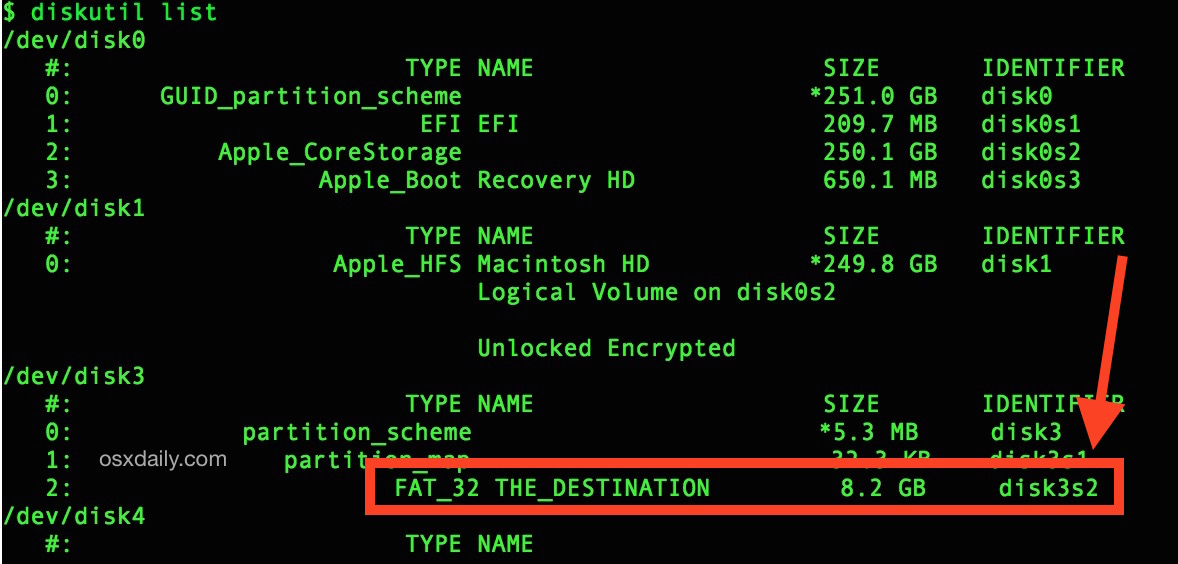
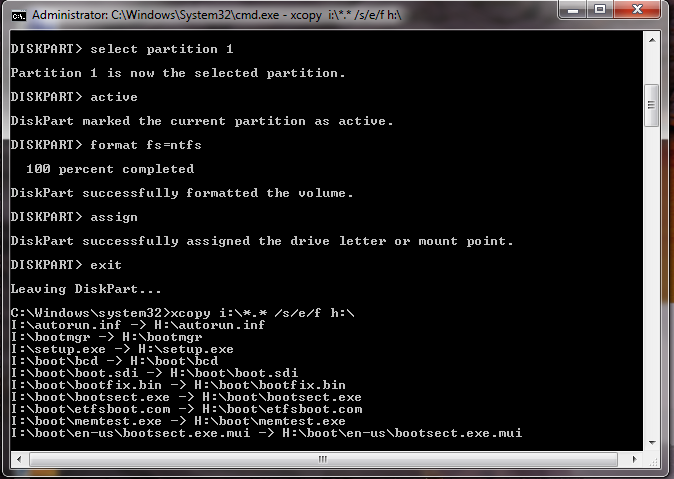
After downloading Windows 11, you'll need to create a Windows bootable USB drive to install the new OS on your Mac. You need to format your bootable USB as a MBR partition before creating the Windows 11 Bootable USB. Since the installer file is bigger than 4GB, we'll be using two separate commands to create the bootable disk. The first command will copy all the files apart from the install.wim file (which is 4.2GB) in size. The second command will use wimlib to split and copy the install.wim file to the USB stick. Since macOS does not support NTFS and the Windows machine does not recognize an EX-FAT file system as a boot option, the prepared USB drives are only of the FAT32 file system.
For me it only took a few minutes, maybe close some applications to free up disk space and pause any other file transfers that are occurring? Also, M1 Mac do not have any support for a windows operating system outside of virtualization currently, so you won't be able to install it if that is what you're planning. Unfortunately, since some time, it became a bit more complicated to create this USB drive from macOS. The main reason for this is because macOS supports only FAT32 as filesystem that is compatible with Windows . FAT32 has a file size limit of 4GB while the installation ISO now contains one file that is larger. With the help of Tenorshare 4DDiG Data Recovery, you can recover lost data from USB drive on Mac easily.

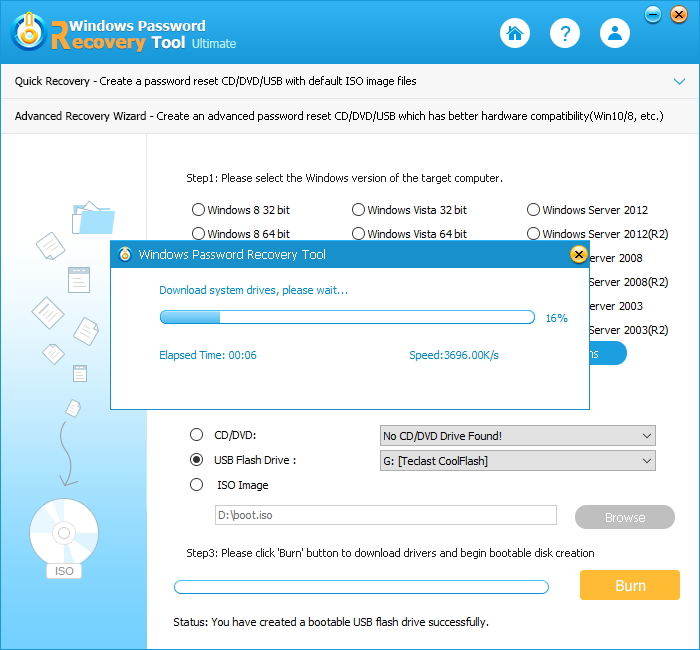
Thinking about how do I create a bootable USB drive for Mac easily? PassFab 4WinKey is an incredible tool that can be used to make Windows bootable USB on Mac. It can be used for several other purposes as well, like for removing or resetting the Windows Admin password. You can know how to create Windows 10 bootable USB on Mac using this tool by following the steps given below. If you want to do a clean install on your computer or laptop, you will need a Windows 11 installation USB stick or a bootable USB flash drive.
No comments:
Post a Comment
Note: Only a member of this blog may post a comment.